
Pumpkin Painting Ideas | Dollar Tree DIY Pumpkin Designs

Pumpkin Painting Ideas | Dollar Tree DIY Pumpkin Designs
Guys, can you believe this pumpkin is that ugly foam pumpkin from Dollar Tree?! This is completely FAKE.. or FAUX if you wanna be chic & fancy. haha. I truly didn't expect the pumpkins to come out THIS GOOD. Sorry I'm using so many caps in this post. Can you tell I'm so excited? This blog post won't just cover one, but TWO designs ANDDDD a free printable guide for creating the clay stumps!! Oh yeah, get excited! You can go ahead and watch the video above or keep reading for the tutorial.. either way, let's get started.
Difficulty: Medium
Materials You'll Need for this Project:
Dollar Tree Pumpkins
Polymer Clay (you can use any color you don't need white)
Paint (blue, yellow, white, tan)
Gray Milk Paint
Paint Brushes
Cinnamon
ModPodge
Leafing Adhesive
Leafing Sheets (Silver)
Hot Glue Sticks
Additional Tools You'll Need:
Oven
Hot Glue Gun
Download the FREE Pumpkin Stump Printable

Step-by-step pumpkin stump tutorial on how to make a clay stump. Photos included are to scale to help making the stump as easy as possible. Printable PDF goes along with the following blog post: www.simplyhandmadestudios.com/blog/pumpkin-painting-ideas-dollar-tree-diy-pumpkin-designs
Instructions:

Let's start making the stump since we'll need to pop it in the oven. Grab your template and a small ball of clay and roll it into a snake, making one side thin and the other thicker. Twirl it and shape it into a design you like.


I then placed the clay stump on the toothpick that comes with the pumpkin to see if it will fit (size wise) and to also pierce a hole on the bottom for easy assembly later on.

Next, I removed the clay and placed it on parchment paper, baking it according to the instructions on the package. I placed the twirls facing down so it kept it’s shape while in the oven. I baked the clay according to the package instructions.


While the clay was baking, I went ahead and painted the pumpkin with 2 coats of white paint.

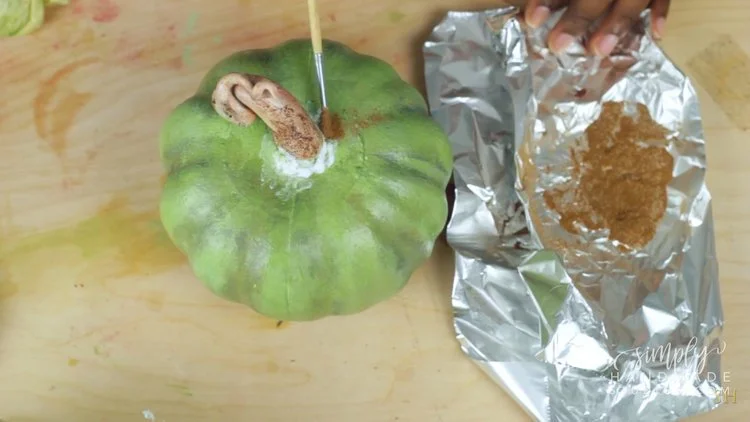
I want the green heirloom pumpkin color so I mixed blue and yellow, adding more yellow to get the color I liked. I removed the stump that came with the foam pumpkin then painted the pumpkin with 2 layers of the green paint I mixed.


Once the stumps were done in the oven (and cool!) I painted it by using tan, let it dry and dry brushed it with some white. I then went over the crevices with brown paint and added this gray milk paint to make it more dirty looking. Check out the YouTube video if you want to see more detailed shots.

I let it dry and brushed on some modpodge and cinnamon so it looks like dirt. I LOVE this technique!! I wish I came up with it but I saw this technique online. I set it aside to dry and painted the rest of the stumps.

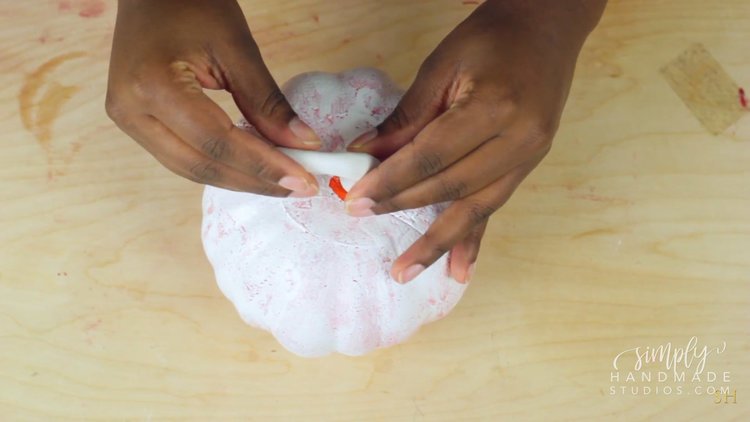
I hot glued the toothpick in place and glued down the stump onto the pumpkin.

I wanted the pumpkin to be more realistic so I added some watered down brown paint and stippled it with a cotton swab. I immediately went over it with some green and had something that looks like this.

I added some dark gray milk paint in the crevices and then added a lighter green paint to the high points for a highlight. I thought the dark was a bit intense so I added a watered down green paint all over to tone it down. I then added modpodge with cinnamon on the crevices and added another wash to tone down the very dark browns.


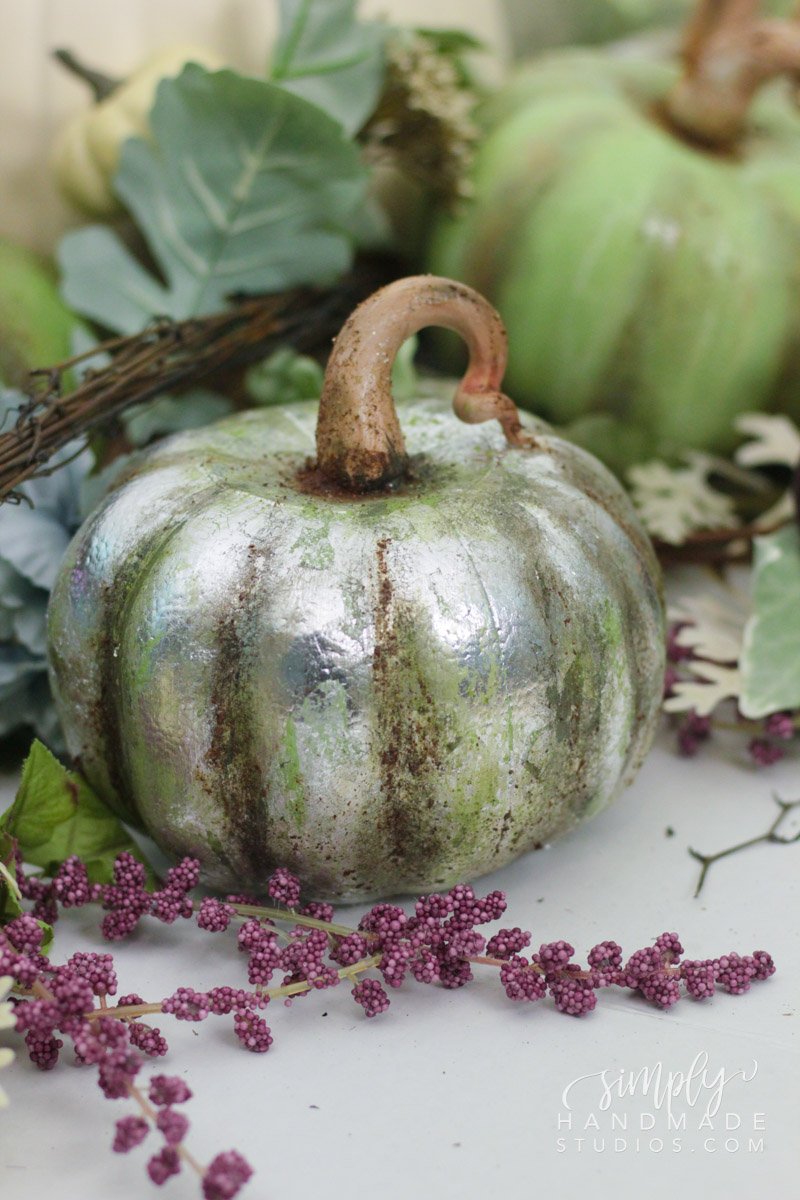
Halloween Pumpkin Ideas - Metallic Silver Pumpkins

I grabbed another pumpkin and added leafing adhesive. You guys know I love my golds and copper but this time I think silver would compliment this color better.

I glued it onto the pumpkin and intensified the crevices with the dark gray milk paint this time. I kept building by adding more paint in the crevice once the previous layer dried. I also made sure to connect each indent by adding strokes from one side to the other. I made the area around the stump dark and added cinnamon and modpodge like i did for the last pumpkin and let it dry.

Once dry, I added a light green wash to bring all the colors together.
Here are the pumpkins displayed on a tablescape I feel would be so perfect for Thanksgiving! I hope you're inspired to grab a bunch of these dollar tree pumpkins and transform them into these beauties. If you love this, be sure to check out how I transformed these (again!) to make a faux planter.

Don't forget to check out the YouTube video if you're interested in watching the process. Let me know how you guys like this before and after transformation! I'd love to hear what you think :)