DIY Small Closet Makeover
Small Closet Makeover - In 6 easy steps!
My focus for 2021 is two fold:
Focus on what I can control.
Create a beautiful and functional space for my family in our apartment while we are here.
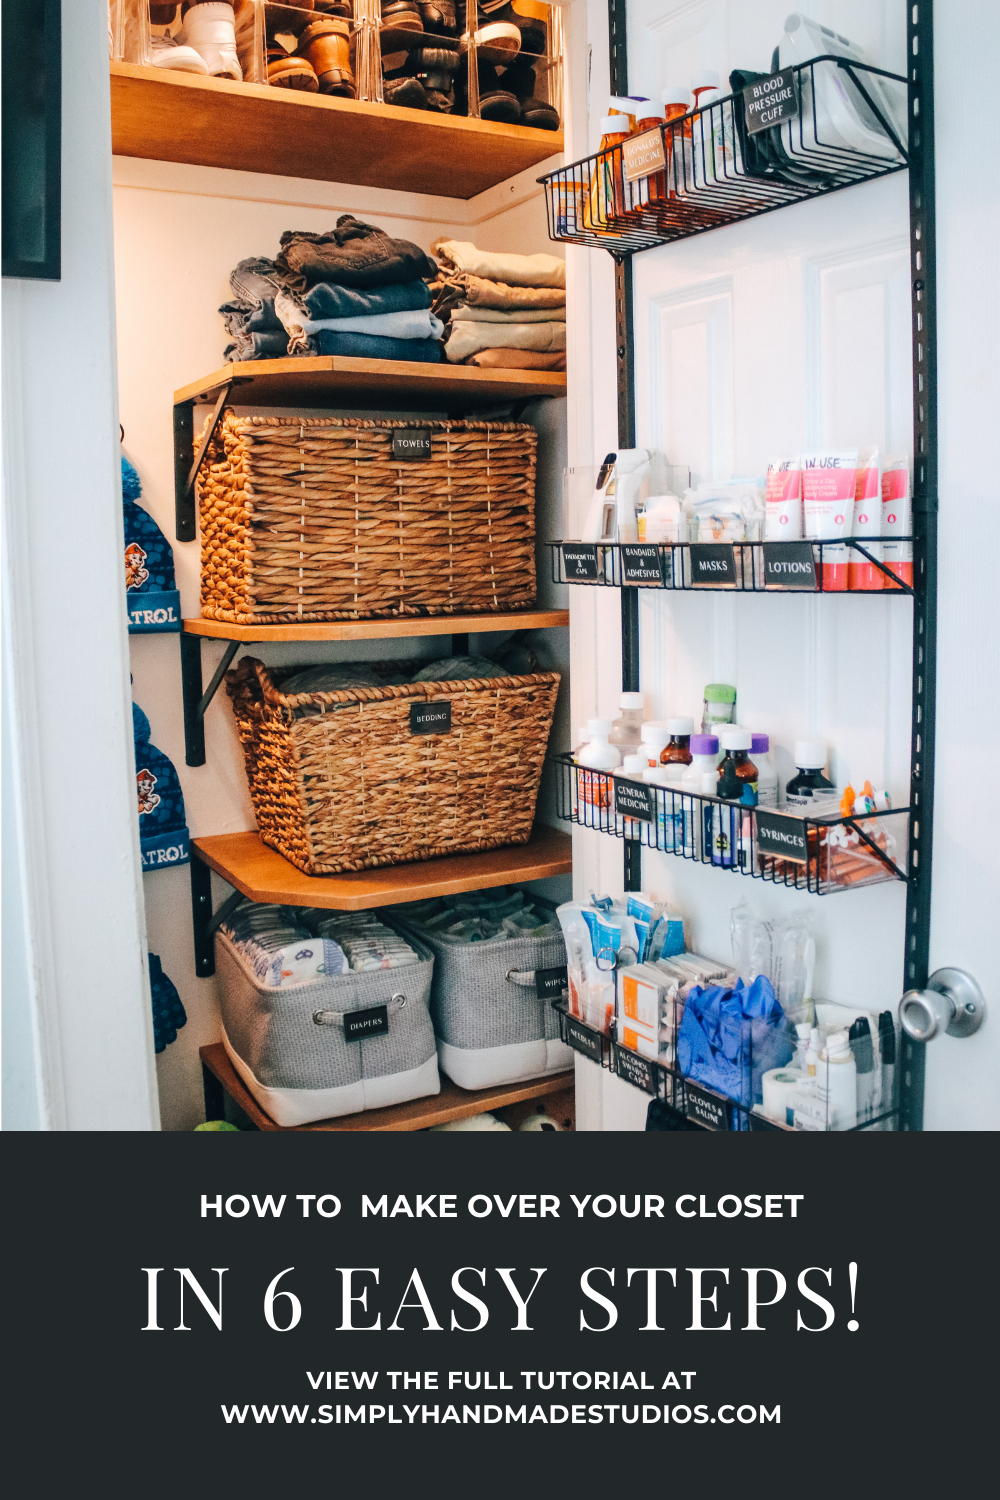
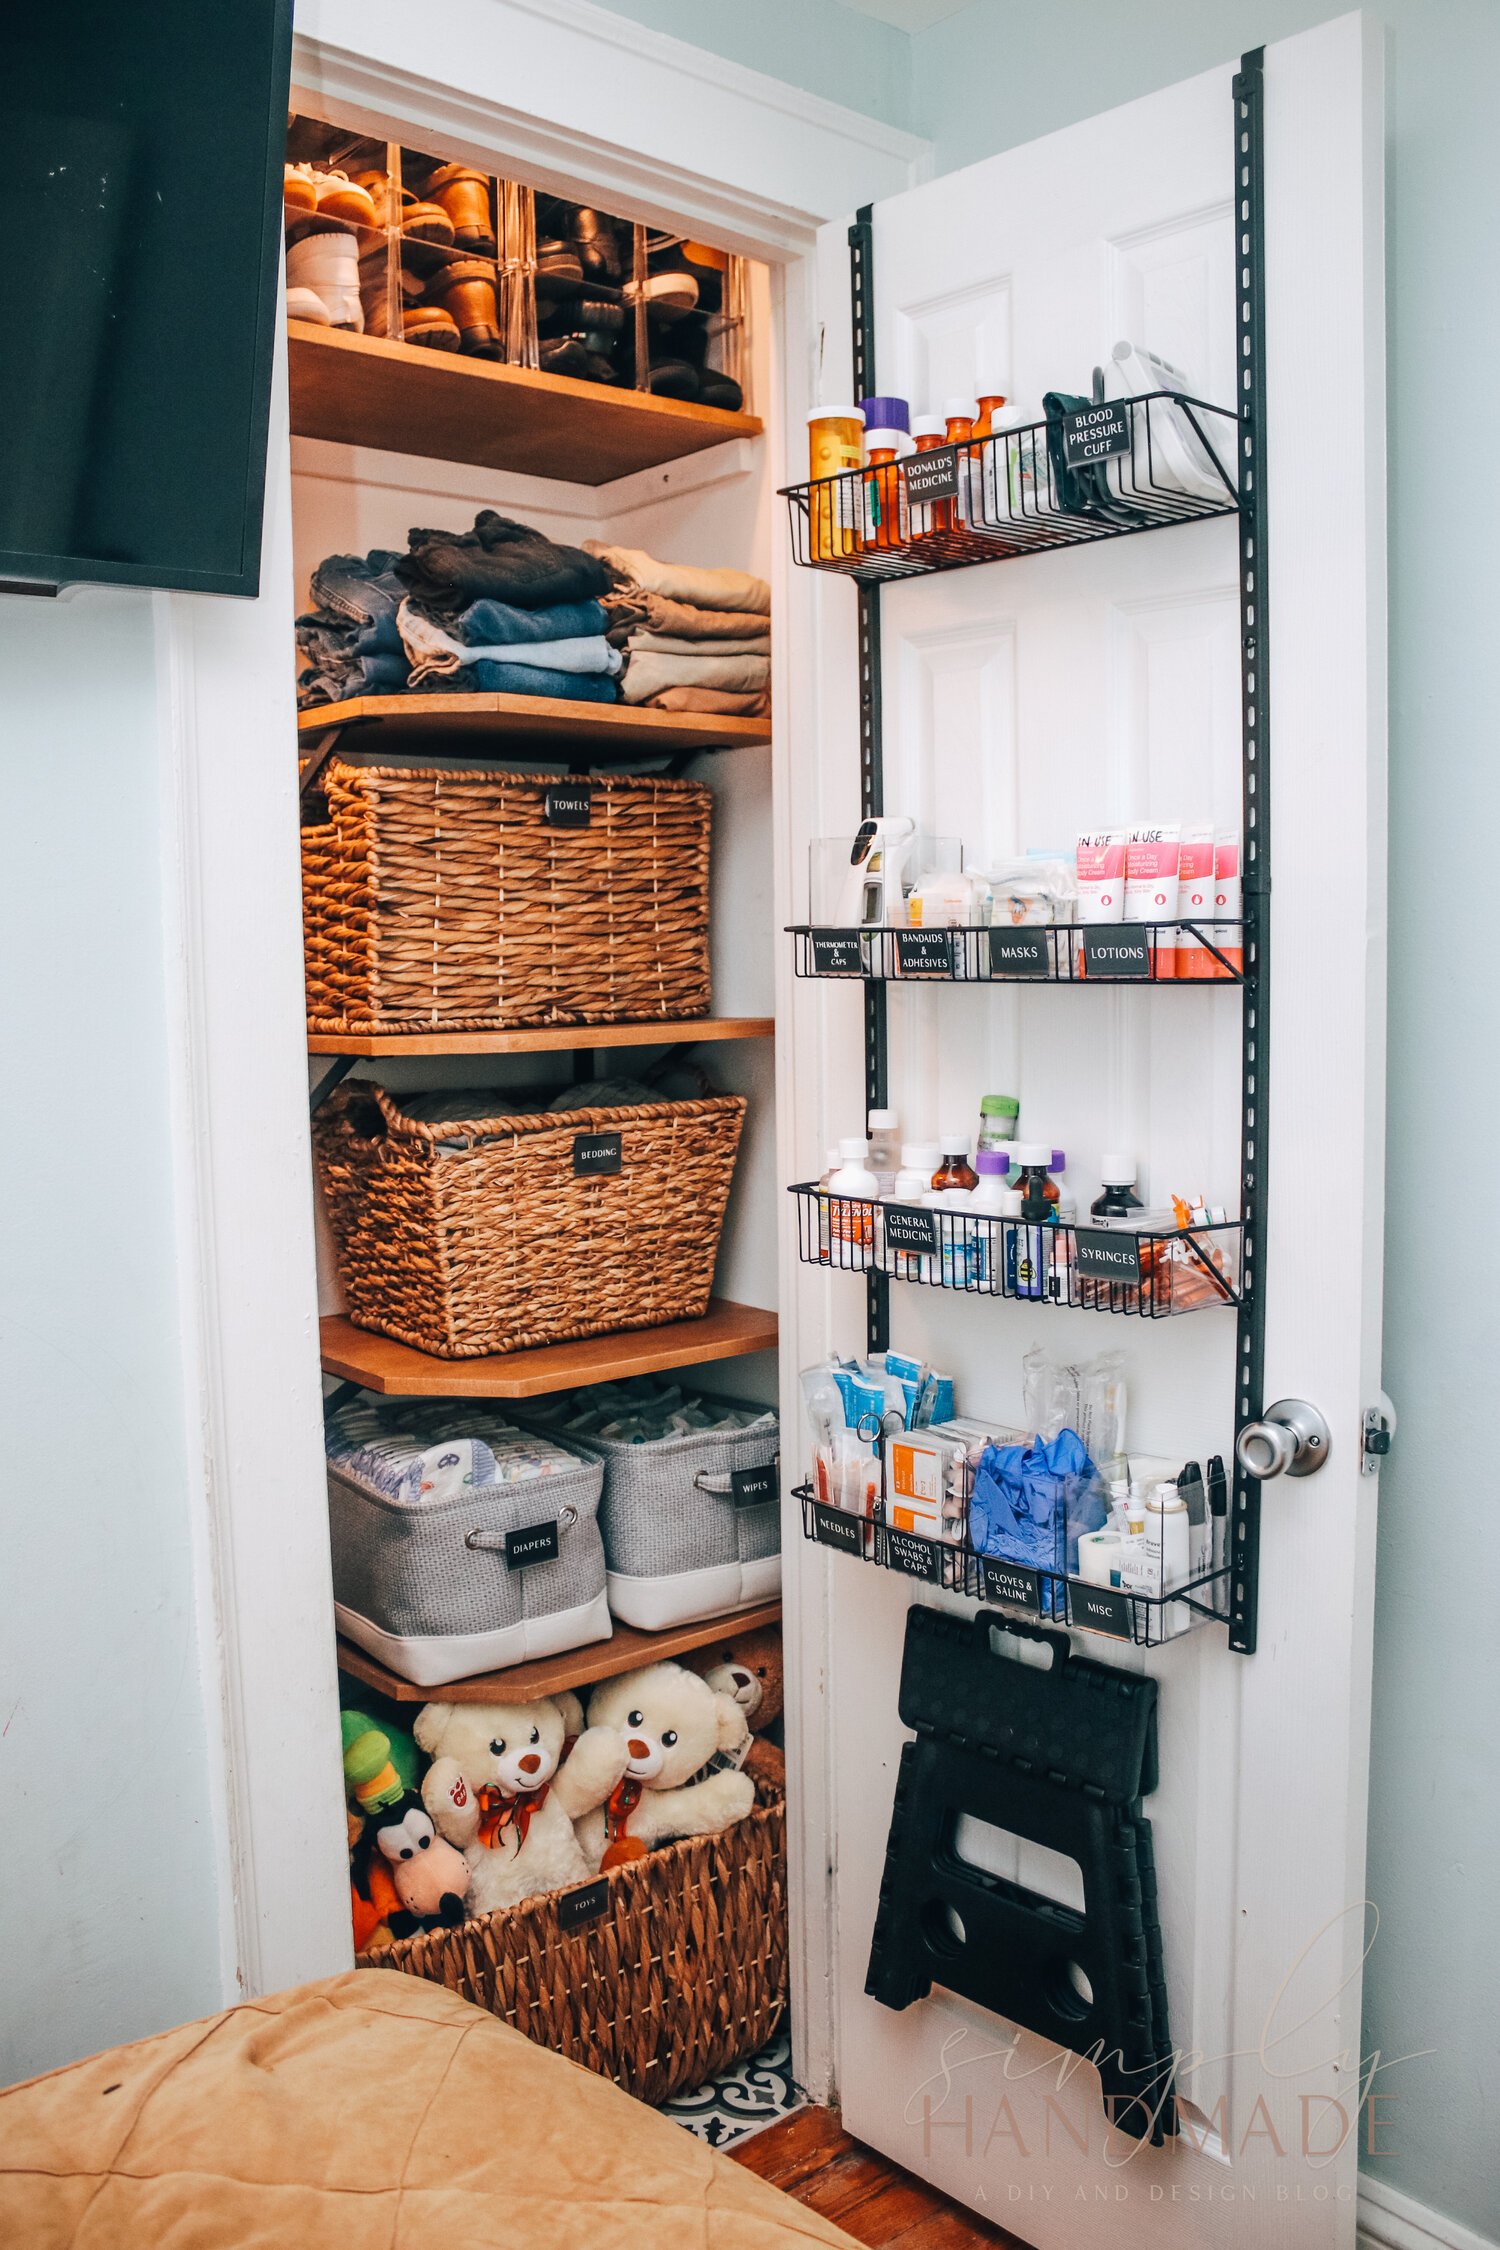
Because these two points are the key focus for me in 2021, I decided to declutter my boys’ closet and make it more functional. I believe by starting here, it would jump start the process of de cluttering, getting things functional, and overall creating a nice and cohesive space for my family. I’m going to show you how I transformed this reach-in closet from completely non-functional to an organization oasis in a few days.
Materials needed for this project:
Pencil
Motion-sensor light (if you don’t have a closet light)
disclaimer: links in this post may be affiliate. Please review the disclosure policy for more information.
Check out the video tutorial:
INSTRUCTIONS:
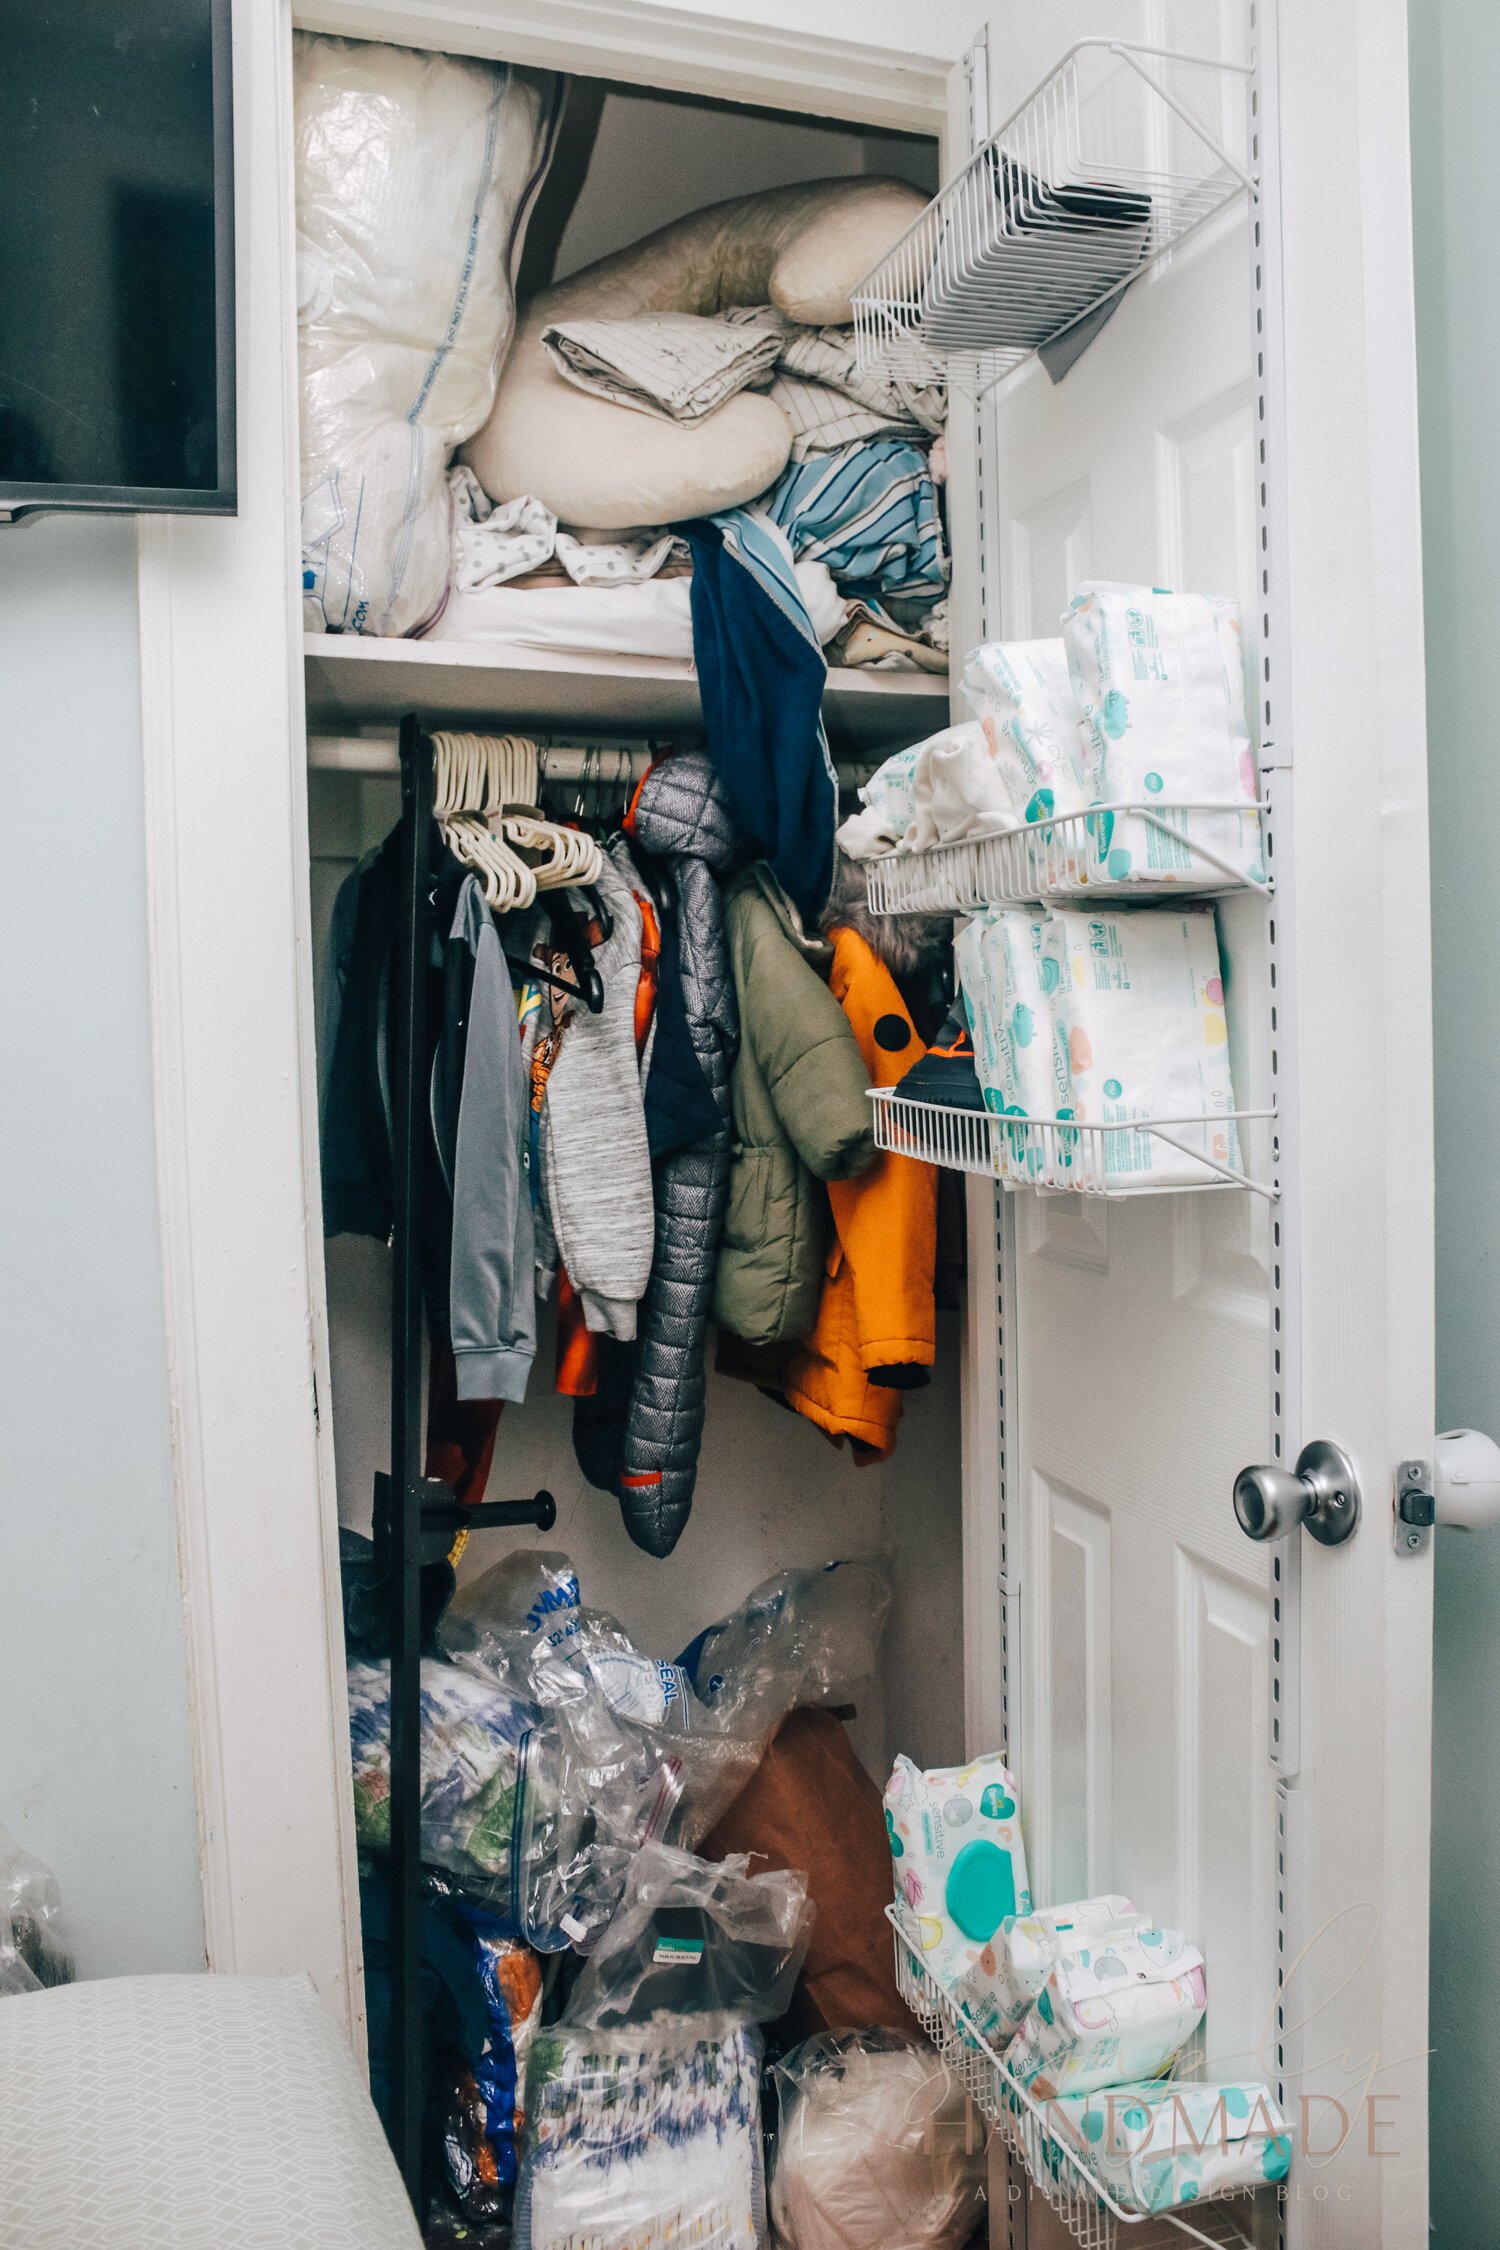
Step 1: De-Clutter the Closet
The first step I do for any makeover is to completely empty the space. This is where the trash bag or contractor bag will come in handy. I guarantee there will be things that need to be thrown away or donate, whether it’s expired cold medicine, clothes that hasn’t seen daylight in ages, or old washcloths or towels. Do whatever works for you! I usually put things into a keep, donate, trash pile and power through this part. It’s not fun, but totally worth it. Also, organizing during this stage will help move things along quickly at the end.

Step 2: Reconfigure the Closet
The closet here is just completely non-functional! I’m going to move the rod and shelves, so I removed all the wood inside and patched up any holes with a fabric mesh and spackling. Please see the “DIY Drywall Repair” blog post to see more details on how I repaired the massive holes after essentially demoing the inside of the closet.
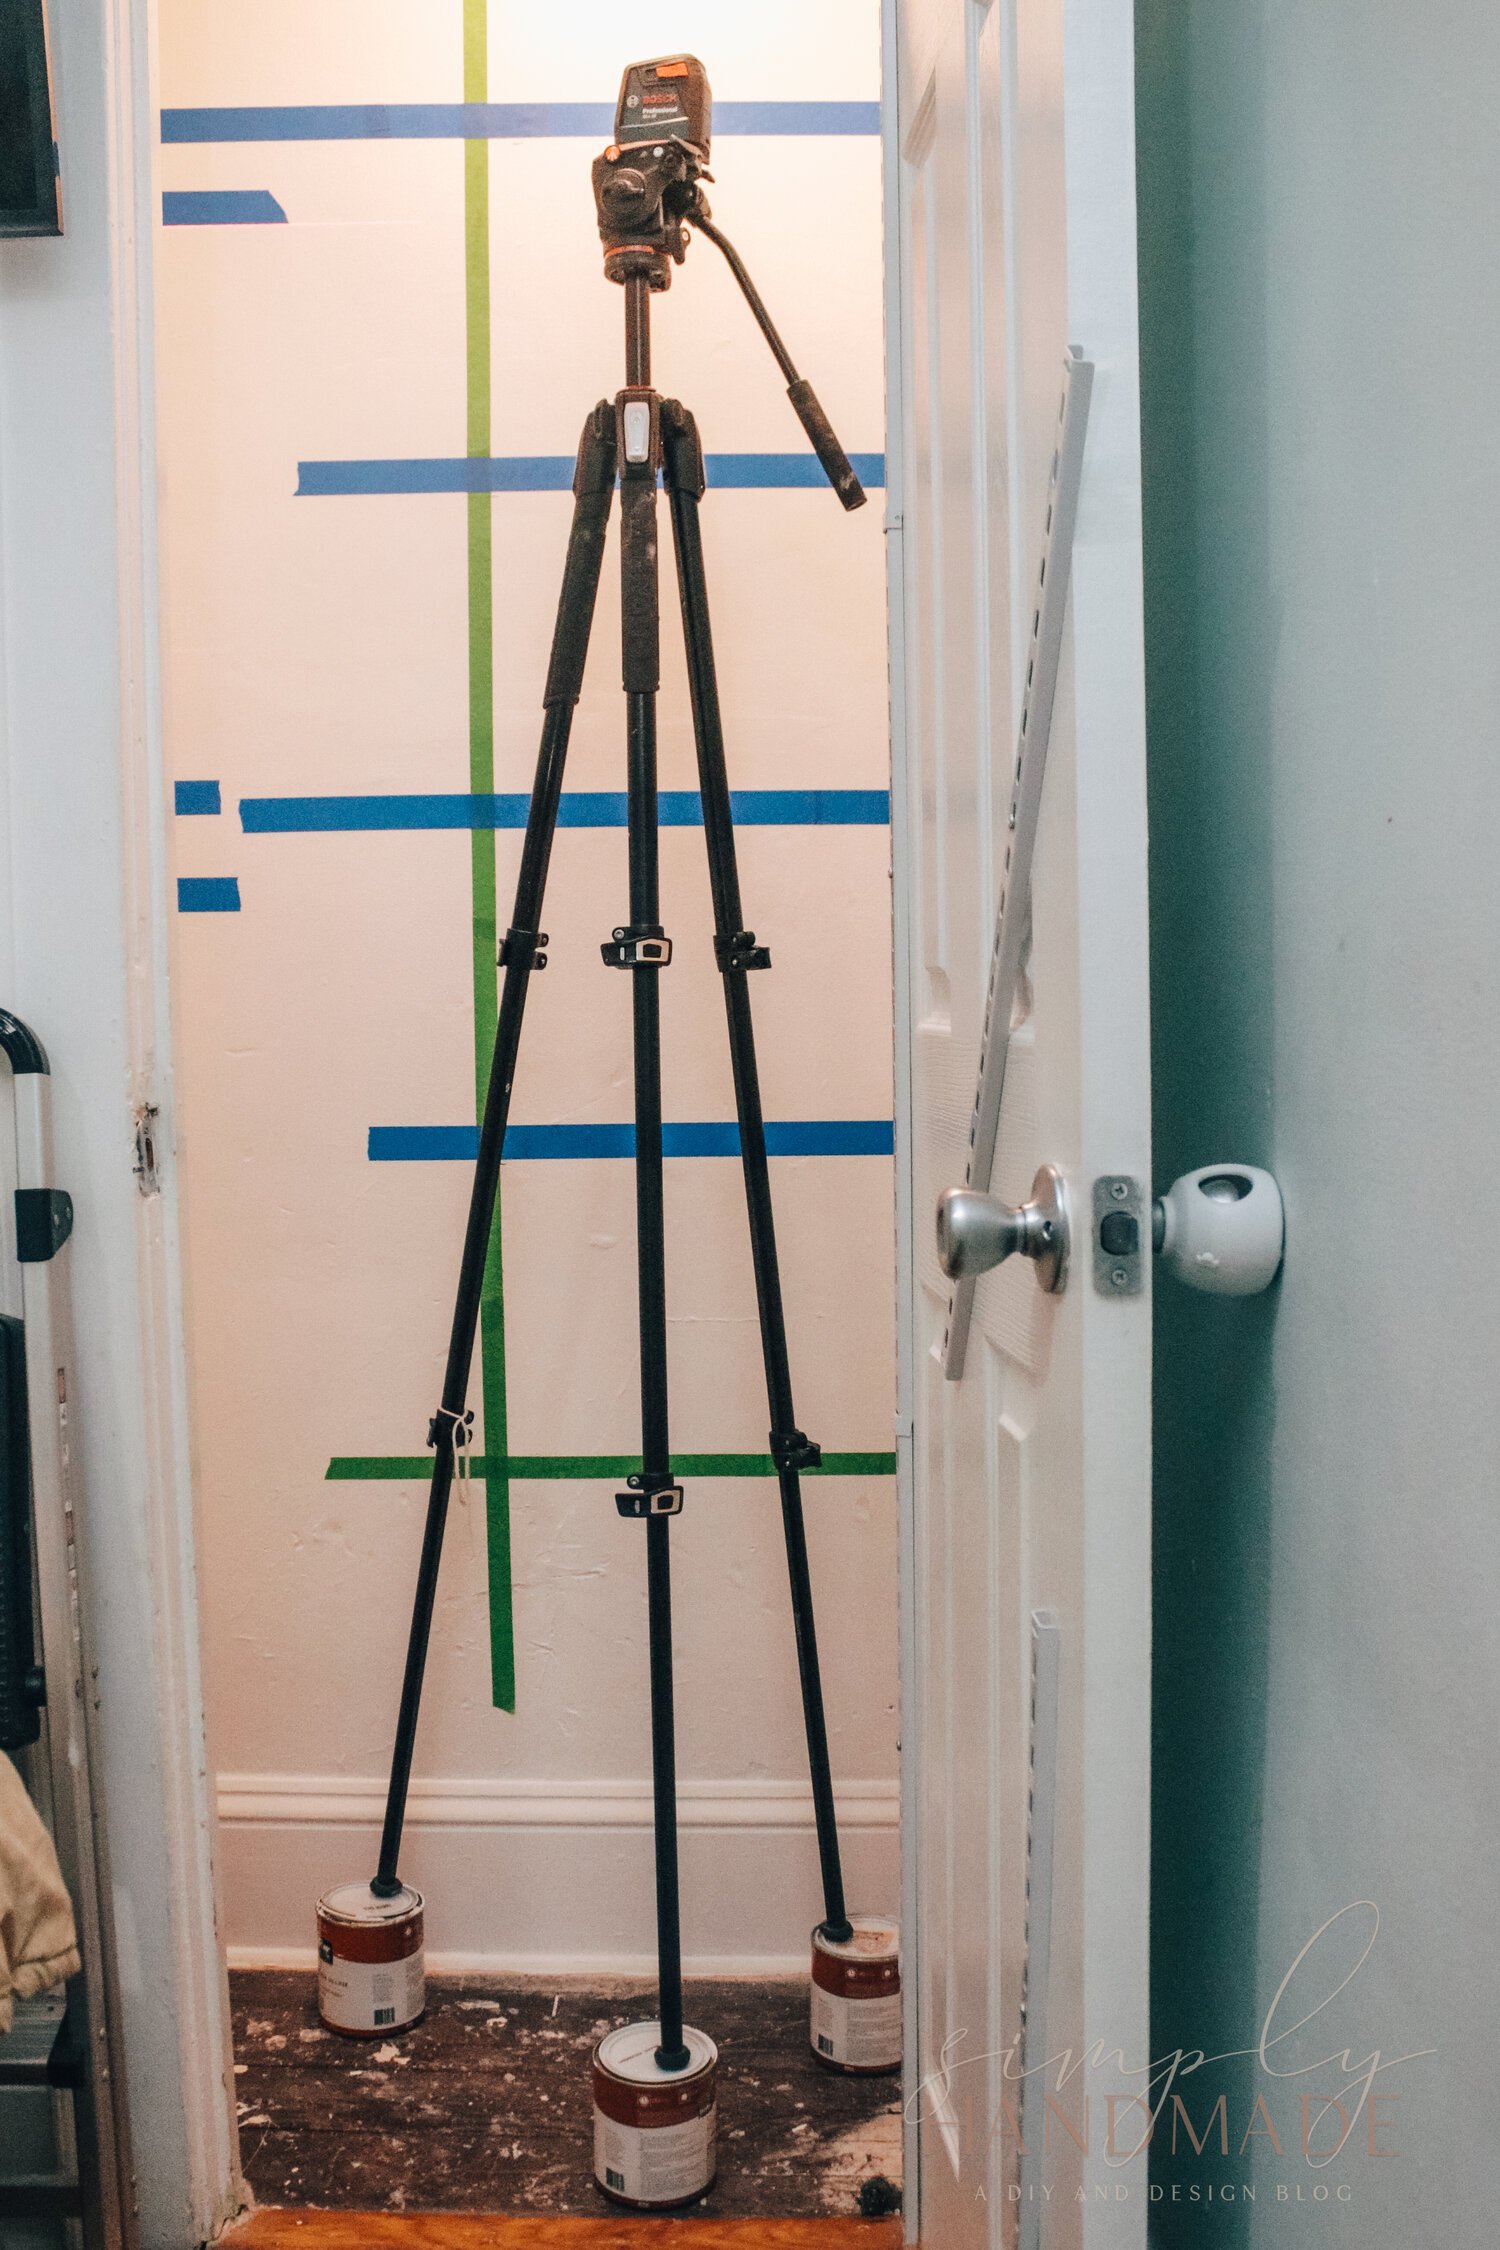
Step 3: Configure the space with Painter’s Tape
After I painted the entire space, I wanted to get a feel of how the closet will look before I placed a single screw or bracket. I used my laser level here to help me ensure all of the tape was straight so when I was done, I could just place the brackets and screws where they needed to go. I propped the level up on my tripod for the tall areas, and for the extra high areas, I used paint cans to further prop it up. This step will entirely depend on the functionality you want in your closet. I knew I wanted the kids’ A/C unit inside, so the shelves had to be a certain height to start. I also knew I wanted the space between the shelves to be roughly 11-12 inches apart. The top portion was going to hold shoes, therefore that needed to be roughly 16 inches from the top of the closet. I eyeballed where I wanted the rods on the inside. The tape really helps to visualize the space.

Step 4: Install the Racks
I honestly didn’t know how much weight these brackets could hold, so I marked where the screws were going to go based on the hardware, and I installed anchor screws. With the anchors in place, the racks can hold a few hundred pounds, which I don’t intend on having on the racks, but it’s really nice to have.

Step 5: Cut and Install the Wood
After I outlined where everything was going to go, I cut all my wood down to size and installed it. I placed wood support for the top of the closet, and cut the wood for the shelves down to 16 inches deep and 22 inches wide. I then added the brackets right under the pieces of tape I added in step 4. I actually pre-stained the wood and then stained it before installing the wood. Using pre-stain is very important so you don’t get a blotchy finish.


Step 6: Install the vinyl Flooring and Organize
If you didn’t know, i live in a rental, so I don’t have many options on the floors. I needed something temporary since I don’t own my apartment, so I came up with something I hope will work out in the long run. Check out this post on “How to Install Permanent Vinyl Flooring in a Rental (that you can remove!)” for more details. Once the floor was dry, I placed all of the things I decided to keep in step 1 and WOW! What a difference! I organized the medicine rack, which is essentially an over-the-door organizer, I added some shoe storage for the boys at the top, I snagged some baskets and put only the essentials I needed for a functional home. I pared things down by A LOT and I only have what’s necessary. I also installed motion-sensor lighting since this closet doesn’t have a light. It’s rechargeable and I’m actually obsessed with it!

I hope you enjoy this closet makeover! This was the first before/after makeover I have done in my apartment and I am hooked. We as renters CAN have all the nice things. It’s up to us to make it happen (with blessing from the landlord of course).
Links to decor items used in this makeover:


Labels: Amazon
*I cut the black backing and labels on my cricut
Shoe Containers: The Container Store